Question,Answer,Category
Browser: debain Chrome更新】How to更新system自带Chromeversion?,Follow these steps\n\n一.deviceUse如下commandInstall新versionChromeversion:\n\n先卸载平板上的chrome: sudo apt-get remove chromium-x11-dbgsym apt-get purge chromium-x11\nInstallcommand:\nsudo apt update\nsudo apt upgrade\nsudo apt install chromium\n\n或者Installsnapd,在通过snapInstallchrome\n\nsudo apt install snapd\nsudo snap install core\nsudo snap install chromium\n\n二.升级成功后How toCheckversion\n\n,Browser
Browser: debain boot自启Chrome】How toboot自动启动该Chrome并全屏自动显示某一个网址?,"参考下面步骤\n\n[my.desktopDownload连接](https://mdmobs.cpuniverse.cn/faq/part2/logo/my.desktop)\n1. 脚本命名:my.desktop\n2. 脚本内容:\n\n [Desktop Entry]\n\n Type=Application\n\n Exec = xhost +\n\n Exec = chromium --kiosk ""http://www.baidu.com/"" --disable-desktop-notifications --no-first-run --kiosk-printing\n3. 把my.desktopfile放在 /home/linaro/.config/autostart/ 路径下赋chmod 777权限\n4. 重启deviceCheckdemoDoes可以自启\n\n 脚本说明:\n\n \* `chromium`: 这是要执行的command,即启动Chromiumbrowser。 \n\n \* `--kiosk`: 这是一个command行参数,使Chromiumbrowser以全屏模式运行,不显示任何工具栏或地址栏。 \n\n \* `""http://www.baidu.com/""`: 这是要在browser中打开的网址,即百度。 \n\n \* `--disable-desktop-notifications`: 禁用桌面通知。 \n\n \* `--no-first-run`: 不显示Chromium的首次运行向导。 \n\n \* `--kiosk-printing`: 允许在kiosk模式下进行打印。",Browser
camera】camera显示的图像为镜像,MDM上有提供camera代码示例源码,可以根据需要进行修改。[Click链接](https://www.cpuniverse.cn/user/document-library-detail-gitbook/index?g=%2Fonline-documents-cn%2FDeveloperGuide%2FMultiMedia%2FCamera%2FRK%2Fcameras.html) \n,Camera
camera】Spring2-10pro机器中,仅Use背部四个航空插头能否支持5*720P或1*720P+4*1080P的组合,支持\n,Camera
camera】Does支持camera插入检测,有检测camera插入的事件。还可以编写软件检测输入的RGB数据Does有变化,从而得出有无camera数据输入\n,Camera
camera】SPRING 10支持的camera分辨率,480P\n,Camera
camera】SPRING 10Does支持更新到Android 6.0以上的version,不支持\n,Camera
camera】SPRING 10-plusUsecamerademo不显示图像,CheckcameraDoes标准航空接头以及分辨率Does为720P或1080P\n,Camera
development environment】Android Studio导入SerialPortLib出错,1、gradleversion不兼容;2、不建议UseSerialPortLib,推荐客户Usecpcomm库\n,Development Environment
development environment】交叉编译链,Download地址:\nRK平台,包含debian/buildroot:[ClickDownload](https://mdmobs.cpuniverse.cn/gitbook/06-%E8%BD%AF%E4%BB%B6%E5%8C%85/%E5%BC%80%E5%8F%91%E7%8E%AF%E5%A2%83%E6%94%AF%E6%8C%81%E5%8C%85/cp_ubuntu_vmware_rk3568/Ubuntu23_RK.7z) \nT3,buildroot:[ClickDownload](https://mdmobs.cpuniverse.cn/gitbook/06-%E8%BD%AF%E4%BB%B6%E5%8C%85/%E5%BC%80%E5%8F%91%E7%8E%AF%E5%A2%83%E6%94%AF%E6%8C%81%E5%8C%85/cp_ubuntu_vmware_t3/Ubuntu18_T3.zip)\n,Development Environment
development environment】debiansystem无法启动start_ui.sh,app动态库放置路径存在异常\n,Development Environment
development environment】Linux下的QT工程在QT for Android下无法编译,纯Linux工程编译脚本没有增加Android的支持,需要修改编译脚本支持Android\n,Development Environment
development environment】交叉编译链增加语言file(.ts)编译失败,交叉编译链中的lrelease编译器为x86version,需要将工程放入机器进行编译\n,Development Environment
Flashing and OTA: OTA upgrade报错】upgrade OTA的过程中提示升级包异常,无法upgrade OTA,How to排查?,Follow these steps\n\n一. First确认提供的OTA包大小Does有Download完全,If遇到OTA的.zip包不完整的情况升级会提示失败\n\n二.升级的过程尽量不要出现断电的情况,否则会导致OTA upgrade失败。\n\n三.If遇到其他升级失败的情况可以直接连接售后,把升级失败的信息拍照片发送给售后。\n\nA:[Androidupgrade OTA说明](https://www.cpuniverse.cn/user/document-library-detail-gitbook/index?g=%2Fonline-documents-cn%2FDeveloperGuide%2FProgrammingTools%2FOTA%2FAndroid%2Fcontent.html)\n\nA:[LINXUupgrade OTA说明](https://www.cpuniverse.cn/user/document-library-detail-gitbook/index?g=%2Fonline-documents-cn%2FDeveloperGuide%2FProgrammingTools%2FOTA%2FDebian%2Fcontent.html),Flashing and OTA
Flashing and OTA: flash via cable失败】Ifflash via cable无法识别端口,或者一直提示更新失败How to处理?,Follow these steps\n\n一.FirstEnsure对应devicedriver有Install成功,MDM上有对应的driver工具。\n\n二.If无法识别端口,FirstCheckdevice管理器Does有未知device,Does有识别到device,If有未知device,右键更新我们的driverfile就可以识别到device。\n\n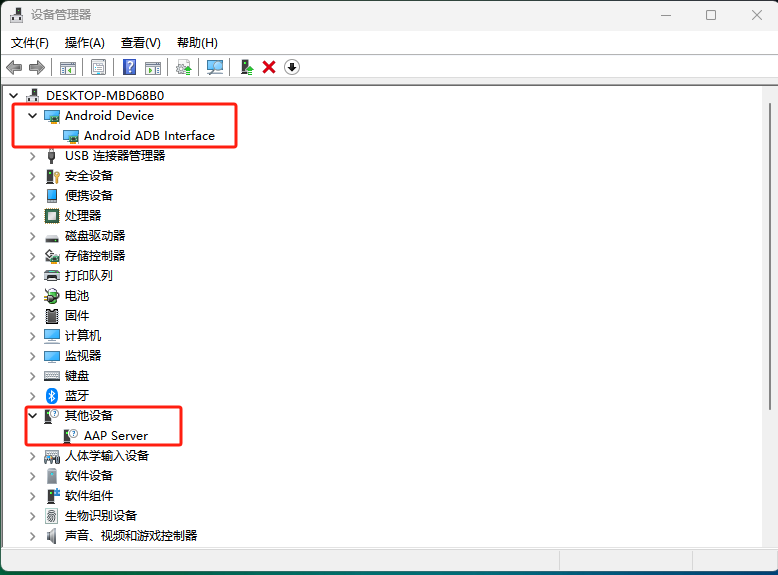\n\n三.RK平台If一直更新失败可以尝试Click工具擦除Flash按钮,其他flashing问题可以直接Contact从平技术相关同仁。\n\n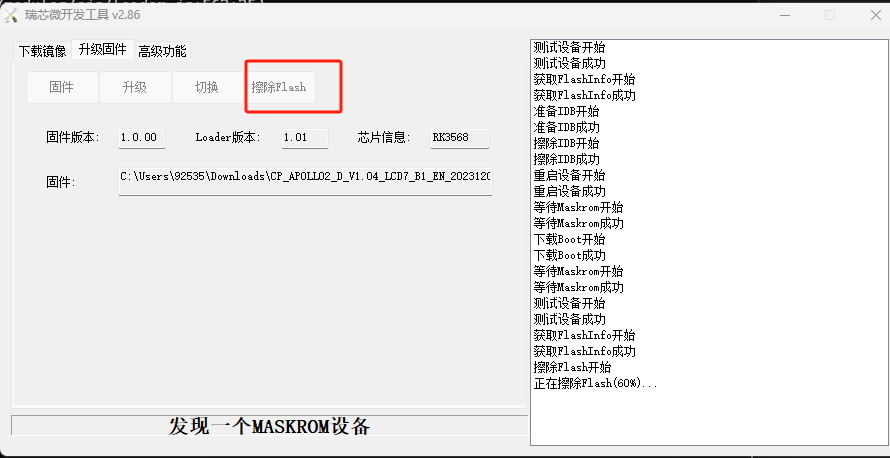,Flashing and OTA
Logo and Boot Animation: logo&bootainmation/分辨率】How to了解从平平板logo和animation分辨率对应的机型?,"参考下面步骤\n\n一. 可以通过登录MDM [LOGO管理 - MDM智能终端管控平台 (cpuniverse.cn)](https://www.cpuniverse.cn/user/logo-management/index) - 选择LOGO管理-Click新增-选择对应的file类型/产品型号/system类型/CheckUse什么分辨率的原始图片,\n\n![]() \n\n二.上传对用的分辨率图片Click保存后可以生成对应格式的logo和animation,直接Click推送选择对应的SN号就可以替换成功",Logo and Boot Animation
Logo and Boot Animation: MDM推送功能支持system】目前我们MDM支持那些型号和system推送logo和animation,"目前Android全系产品支持推送logo和animation,debainsystem目前不支持mdm,可以UseU盘替换参考Q5说明",Logo and Boot Animation
Logo and Boot Animation: Android老version不支持MDM】Android老version不支持MDMHow to升级?,"UseAPK升级MDM,此APK只支持APOLLO的device,其他不支持。\n\n[不支持MDMdevice需要更新MDM apkDownload连接](https://mdmobs.cpuniverse.cn/faq/part2/logo/MDMUpdate_1.3.apk)\n\n一.ClickDownload更新APK链接,Download完成后Install在device上,可以通过adb install /**.apk Install,ClickMdmUpdate打开,Ifdevice已经支持MDM后会提示When前version支持mdm服务,\n\n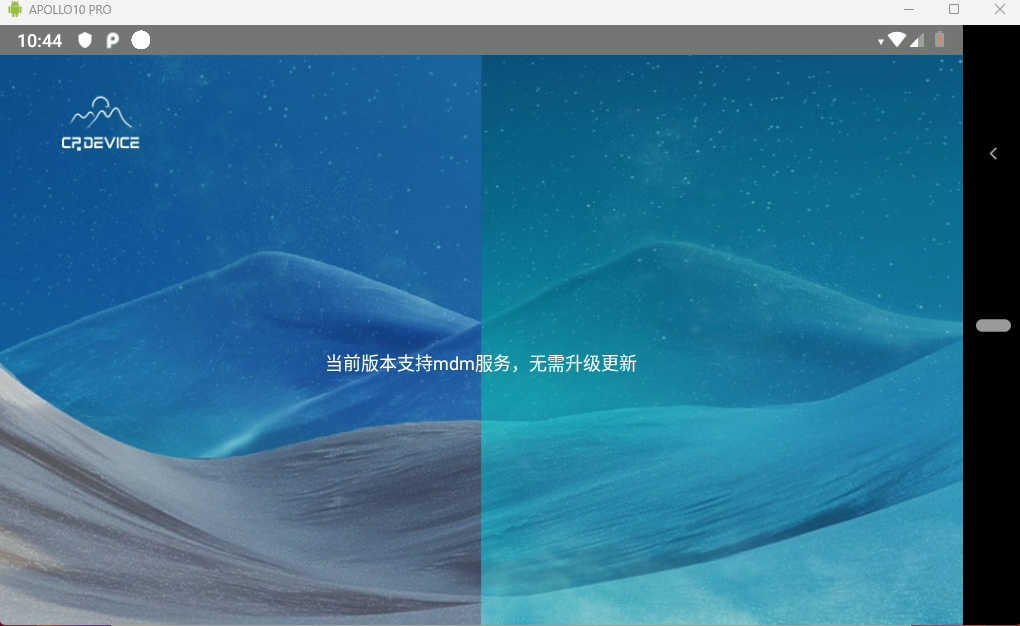\n\nIf不支持MDM的device连接network,Click一键Download升级,device会自动Downloadmdmapk并Install重启,重启后 把SN号提供给从平技术人员。\n\n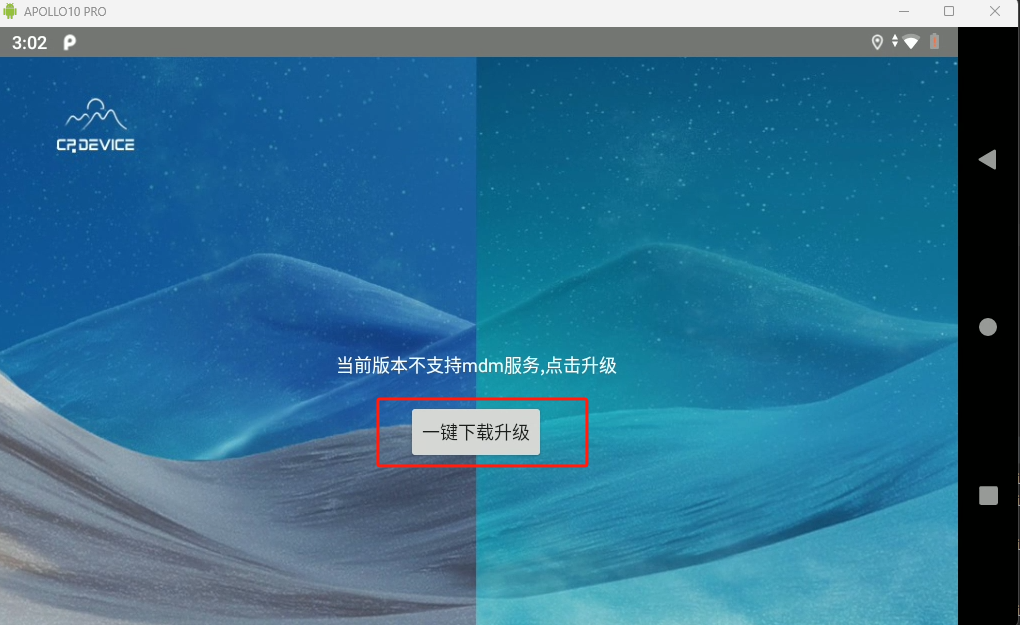",Logo and Boot Animation
Logo and Boot Animation: linux-logo-animation】 linuxHow to替换logo和animation?,"SPRING 1/SPRING 2系列的boot界面由三个部分组成:bootlogo+补帧画面+bootanimation\n\n[FFmpeg工具包Download连接](https://mdmobs.cpuniverse.cn/faq/part2/logo/Logo.rar)\n\n#### 1.logo和bootanimation可以通过MDM制作/或者手动制作方法如下:\n\nbootanimation制作方法:\n1. 电脑没有ffmpeg,需要添加ffmpeg-master-latest-win64-gpl/bin 环境变量\n2. 将图片放入一个单独的file夹,大量复制在180个图片左右,且图片为正向显示,格式必须为png,1024*600\n3. 双击打开“T3-SC60-RK-logoanimation制作-7-10寸.exe”,Click“批量重命名png”,选择图片的路径(需要认真核对好图片file,以防改变电脑其他file名称),核对好后Click确定\n4. 在图片路径上方输入cmd,即可打开cmd窗口,输入ffmpegcommand生成yuv视频语句:\n\nffmpeg -r 25 -i v%4d.png -pix_fmt yuv420p -s 1024x600 video_demo.yuv\n备注:\n\- r为视频帧率,一般为15、25若可以根据时间要求修改此值;\n\- i为要提取的图片名称,图片为从0递增格式,%4d表示格式为4位整数,由于图片名字出来以v0001开头,所以填v%4d.png;\n\- pix_fmt为视频帧格式,指定yuv420p;\n\- s为视频的分辨率。\n5. 完成后可以输入command播放yuvfile预览:\n\nffplay -f rawvideo -pixel_format yuv420p -video_size 1024x600 video_demo.yuv\n\n#### 2.T3 linux logo补帧制作方法:\n1. 将bootlogo.bmp转换成bootlogo.jpg (180度旋转,注意此图片需要正向,不需要倒置状态,格式必须是jpg),放入此t3-linux-make-logofile夹\n2. device上电,连接adb到电脑\n3. 双击file中的step1.bat\n4. 等待显示图片后,在双击step2.bat\n5. 等待device重启后,logo即为init过程中补帧需要的file\n\n#### 3.把对应的脚本放在U盘根目录\n\n[unattended_installation.shDownload连接](https://mdmobs.cpuniverse.cn/faq/part2/logo/unattended_installation.sh)\n1. 将生成logo、video_demo.yuv、bootlogo.bmp和unattended_installation等4个file放入U盘根目录,U盘需为2.0的U盘,device上电后插入U盘,进入设置-》U盘查看-》打开Host设置-》Click“静默Install”等待device重启即可替换Logo成功 \n\n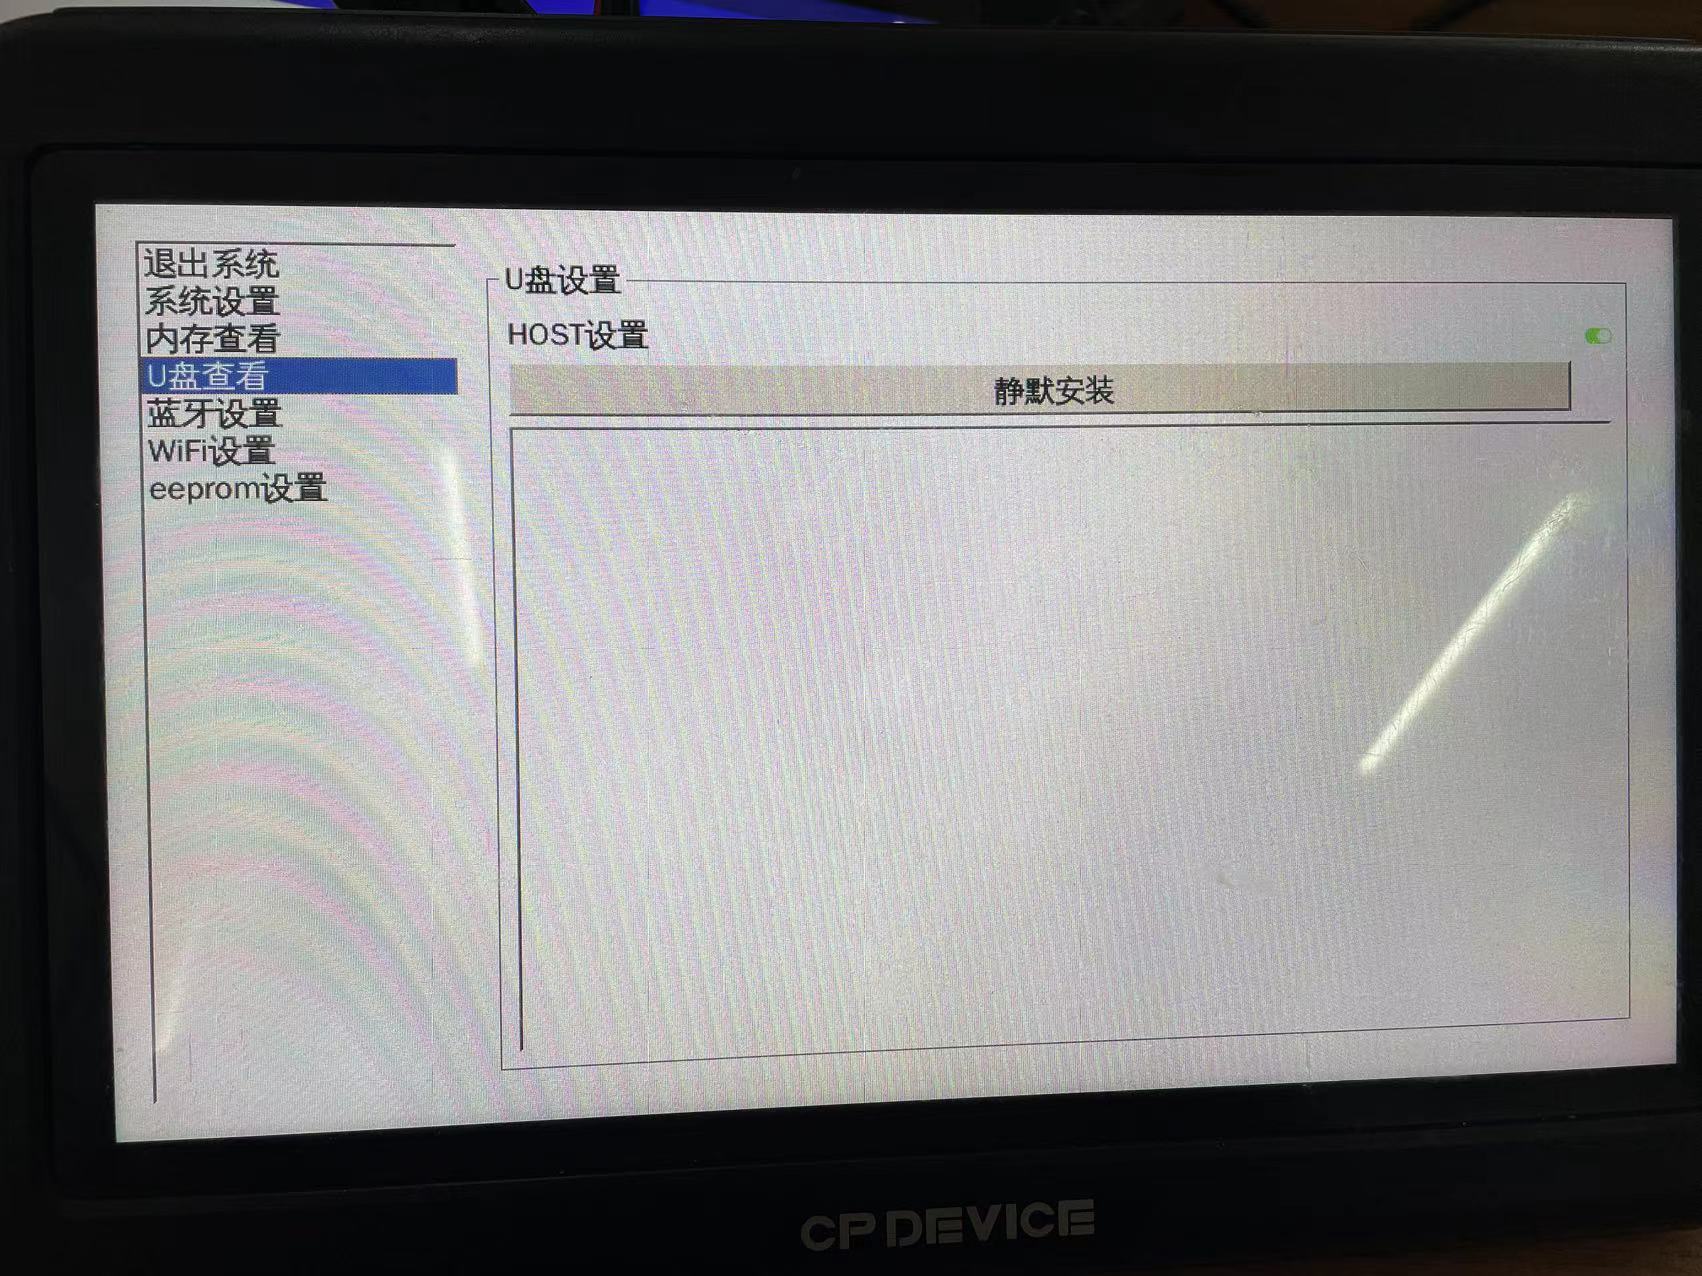",Logo and Boot Animation
Logo and Boot Animation: Debain-logo-animation】 debainHow toU盘替换logo和animation?,[U盘替换logo模板Download连接](https://mdmobs.cpuniverse.cn/faq/part2/logo/%E6%96%B9%E5%BC%8F%E4%BA%8C.rar)\n\n一.U盘脚本替换\n\n注意:将bootlogo.bmp和unattended_installation.sh 脚本放入U盘根目录,图片要与device型号要求匹配\n1. applications->system->unattended_installation Tool \n2. 插入U盘,Clickopen,等待device重启,Logo and Boot Animation
Logo and Boot Animation: Android 不支持MDMHow to替换logo和animation】不支持MDMHow toUseU盘替换logo和animation,"Configurefile样本Download连接:\n\n[U盘替换logo脚本Download连接](https://mdmobs.cpuniverse.cn/faq/part2/logo/U%E7%9B%98%E9%85%8D%E7%BD%AE%E6%96%87%E4%BB%B6.rar)\n\nCpService.xml->RK系列\n\nE9631Service.xml->T3系列\n\nVanService.xml->SC60系列\n\n一、适用机型 \n\n适用于移动的 T3 平台 SPRING 等系列,Android 6.0 system。 \n\n二、Use说明 \n\n支持热拔插的 TF 卡或 U 盘,支持热拔插的在system启动或每次插入时。 \n\n三、file说明 \n1. file必须放在 TF 卡或 U 盘的根目录; \n2. file名必须为“VanService.xml”,且file名大小写必须一致,file编码为 utf-8; \n3. file内容说明 \n\nSPRING 1、2 自启fileUse说明\n一、适用机型\n适用于移动的 T3 平台 SPRING 等系列,Android 6.0 system。\n二、Use说明\n支持热拔插的 TF 卡或 U 盘,支持热拔插的在system启动或每次插入时。\n三、file说明\n1. file必须放在 TF 卡或 U 盘的根目录;\n2. file名必须为“VanService.xml”,且file名大小写必须一致,file编码为 utf-8;\n3. file内容说明\n\n\n
\n\n二.上传对用的分辨率图片Click保存后可以生成对应格式的logo和animation,直接Click推送选择对应的SN号就可以替换成功",Logo and Boot Animation
Logo and Boot Animation: MDM推送功能支持system】目前我们MDM支持那些型号和system推送logo和animation,"目前Android全系产品支持推送logo和animation,debainsystem目前不支持mdm,可以UseU盘替换参考Q5说明",Logo and Boot Animation
Logo and Boot Animation: Android老version不支持MDM】Android老version不支持MDMHow to升级?,"UseAPK升级MDM,此APK只支持APOLLO的device,其他不支持。\n\n[不支持MDMdevice需要更新MDM apkDownload连接](https://mdmobs.cpuniverse.cn/faq/part2/logo/MDMUpdate_1.3.apk)\n\n一.ClickDownload更新APK链接,Download完成后Install在device上,可以通过adb install /**.apk Install,ClickMdmUpdate打开,Ifdevice已经支持MDM后会提示When前version支持mdm服务,\n\n\n\nIf不支持MDM的device连接network,Click一键Download升级,device会自动Downloadmdmapk并Install重启,重启后 把SN号提供给从平技术人员。\n\n",Logo and Boot Animation
Logo and Boot Animation: linux-logo-animation】 linuxHow to替换logo和animation?,"SPRING 1/SPRING 2系列的boot界面由三个部分组成:bootlogo+补帧画面+bootanimation\n\n[FFmpeg工具包Download连接](https://mdmobs.cpuniverse.cn/faq/part2/logo/Logo.rar)\n\n#### 1.logo和bootanimation可以通过MDM制作/或者手动制作方法如下:\n\nbootanimation制作方法:\n1. 电脑没有ffmpeg,需要添加ffmpeg-master-latest-win64-gpl/bin 环境变量\n2. 将图片放入一个单独的file夹,大量复制在180个图片左右,且图片为正向显示,格式必须为png,1024*600\n3. 双击打开“T3-SC60-RK-logoanimation制作-7-10寸.exe”,Click“批量重命名png”,选择图片的路径(需要认真核对好图片file,以防改变电脑其他file名称),核对好后Click确定\n4. 在图片路径上方输入cmd,即可打开cmd窗口,输入ffmpegcommand生成yuv视频语句:\n\nffmpeg -r 25 -i v%4d.png -pix_fmt yuv420p -s 1024x600 video_demo.yuv\n备注:\n\- r为视频帧率,一般为15、25若可以根据时间要求修改此值;\n\- i为要提取的图片名称,图片为从0递增格式,%4d表示格式为4位整数,由于图片名字出来以v0001开头,所以填v%4d.png;\n\- pix_fmt为视频帧格式,指定yuv420p;\n\- s为视频的分辨率。\n5. 完成后可以输入command播放yuvfile预览:\n\nffplay -f rawvideo -pixel_format yuv420p -video_size 1024x600 video_demo.yuv\n\n#### 2.T3 linux logo补帧制作方法:\n1. 将bootlogo.bmp转换成bootlogo.jpg (180度旋转,注意此图片需要正向,不需要倒置状态,格式必须是jpg),放入此t3-linux-make-logofile夹\n2. device上电,连接adb到电脑\n3. 双击file中的step1.bat\n4. 等待显示图片后,在双击step2.bat\n5. 等待device重启后,logo即为init过程中补帧需要的file\n\n#### 3.把对应的脚本放在U盘根目录\n\n[unattended_installation.shDownload连接](https://mdmobs.cpuniverse.cn/faq/part2/logo/unattended_installation.sh)\n1. 将生成logo、video_demo.yuv、bootlogo.bmp和unattended_installation等4个file放入U盘根目录,U盘需为2.0的U盘,device上电后插入U盘,进入设置-》U盘查看-》打开Host设置-》Click“静默Install”等待device重启即可替换Logo成功 \n\n",Logo and Boot Animation
Logo and Boot Animation: Debain-logo-animation】 debainHow toU盘替换logo和animation?,[U盘替换logo模板Download连接](https://mdmobs.cpuniverse.cn/faq/part2/logo/%E6%96%B9%E5%BC%8F%E4%BA%8C.rar)\n\n一.U盘脚本替换\n\n注意:将bootlogo.bmp和unattended_installation.sh 脚本放入U盘根目录,图片要与device型号要求匹配\n1. applications->system->unattended_installation Tool \n2. 插入U盘,Clickopen,等待device重启,Logo and Boot Animation
Logo and Boot Animation: Android 不支持MDMHow to替换logo和animation】不支持MDMHow toUseU盘替换logo和animation,"Configurefile样本Download连接:\n\n[U盘替换logo脚本Download连接](https://mdmobs.cpuniverse.cn/faq/part2/logo/U%E7%9B%98%E9%85%8D%E7%BD%AE%E6%96%87%E4%BB%B6.rar)\n\nCpService.xml->RK系列\n\nE9631Service.xml->T3系列\n\nVanService.xml->SC60系列\n\n一、适用机型 \n\n适用于移动的 T3 平台 SPRING 等系列,Android 6.0 system。 \n\n二、Use说明 \n\n支持热拔插的 TF 卡或 U 盘,支持热拔插的在system启动或每次插入时。 \n\n三、file说明 \n1. file必须放在 TF 卡或 U 盘的根目录; \n2. file名必须为“VanService.xml”,且file名大小写必须一致,file编码为 utf-8; \n3. file内容说明 \n\nSPRING 1、2 自启fileUse说明\n一、适用机型\n适用于移动的 T3 平台 SPRING 等系列,Android 6.0 system。\n二、Use说明\n支持热拔插的 TF 卡或 U 盘,支持热拔插的在system启动或每次插入时。\n三、file说明\n1. file必须放在 TF 卡或 U 盘的根目录;\n2. file名必须为“VanService.xml”,且file名大小写必须一致,file编码为 utf-8;\n3. file内容说明\n\n\n![]() \n\n 二. TANK2device通过serial portcommandCheckDoes有NEMA数据输出:\n\n 1. Usecat /dev/ttyUSB1\n\n adb shell ->进入device\n\n cat /dev/ttyUSB1\n\n 输入完成后会自动吐NEMA相关数据,具体输出格式如下:\n\n $GPGGA,005003.00,1630.570401,,06808.610803,W,1,10,0.7,3770.7,M,40.0,M,,*5A\n\n 2. If输出显示乱码Check波特率Does设置,通过adb设置115200波特率command如下:\n\n adb shell "" stty -F /dev/ttyS0 ispeed 115200 ospeed 115200 cs8""\n3. 输出GGA执行如下:\n\n echo \""GNGGA 1\r\n\"" > /dev/ttyS0 或者Use自带serial port工具发送:LOG GPGGA ONTIME 1\n\ndevice型号/板卡/serial port对应表:\n\n| SPRING1 | ublox | UM982 | UM4B0 | UM482 | UM960 | UM980 | MXT906B | P20E |\n| ---------- | ----- | ----- | ----- | ----- | ----- | ------- | ------- | -------- |\n| ttyS0 | | COM2 | COM3 | COM3 | | | | |\n| ttyS2 | | COM1 | COM1 | COM1 | | | | |\n| | | | | | | | | |\n| SPRING2 | ublox | UM982 | UM4B0 | UM482 | UM960 | UM980 | MXT906B | P20E |\n| ttyS0 | | COM2 | COM3 | COM3 | COM1 | COM1 | COM1 | COM1 |\n| ttyS2 | COM1 | COM1 | COM1 | COM1 | COM2 | COM2 | COM2 | COM2 |\n| | | | | | | | | |\n| | | | | | | | | |\n| APOLLO PRO | ublox | UM982 | UM4B0 | UM482 | UM960 | UM980 | MXT906B | 南方电台 |\n| ttyWK0 | | COM1 | COM1 | COM1 | | | | COM1 |\n| ttyWK2 | | COM3 | COM3 | COM3 | | | | COM3 |\n| ttyHSL2 | | | | | | | | COM2 |\n| | | | | | | | | |\n| APO2 7/12 | ublox | UM982 | UM4B0 | UM482 | UM980 | MXT906B | P20E | P20F |\n| ttyS0 | | COM2 | | | COM2 | COM2 | COM2 | COM2 |\n| ttyS7 | | COM1 | | | COM1 | COM1 | COM1 | COM1 |\n| | | | | | | | | |\n| SP2 10PRO | ublox | UM982 | UM4B0 | UM482 | UM960 | UM980 | MXT906B | P20E |\n| ttyS0 | | COM2 | | | | COM2 | COM2 | COM2 |\n| ttyS4 | | COM1 | | | | COM1 | COM1 | COM1 |\n| | | | | | | | | |\n| TANK1 | ublox | UM982 | UM4B0 | UM482 | UM960 | UM980 | MXT906B | P20E |\n| ttyHSL2 | COM1 | | | COM3 | | | | |\n| | | | | | | | | |\n| TANK2 | ublox | UM982 | UM4B0 | UM482 | UM960 | UM980 | MXT906B | P20E |\n| ttyS0 | | COM2 | | | | COM2 | COM2 | COM2 |\n| ttyS7 | | COM1 | | | | COM1 | COM1 | COM1 |\n\n------",Positioning Module
Positioning Module: TANK2 EG25】如和把原始数据转换成经纬度生成.kmlfile,"一. Use如图公式生成经纬度,根据经纬度导入后生成.kmlfile\n\n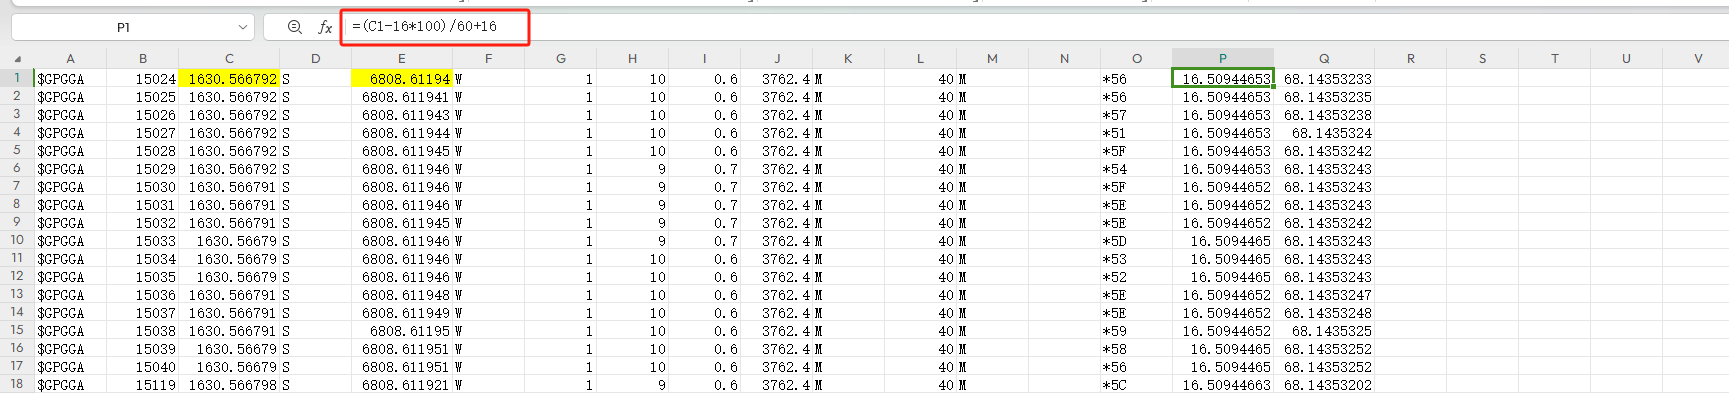\n\nA=C的整数\n(C-A*100)/60+A\n\n二. EG25支持卫星 GPS, BeiDou, Galileo and GLONASS",Positioning Module
Positioning Module: UM982】板卡升级version提示失败,1.需要boot直接进入UM982升级的APK,否则会有serial port被占用的情况导致升级失败。\n\n[UM98升级apkDownload连接](https://mdmobs.cpuniverse.cn/faq/part4/MeterLevel/UM982%E5%8D%87%E7%BA%A7.apk)\n\n升级firmwareContact从平售后\n\nInstallapk升级方法如图:\n\n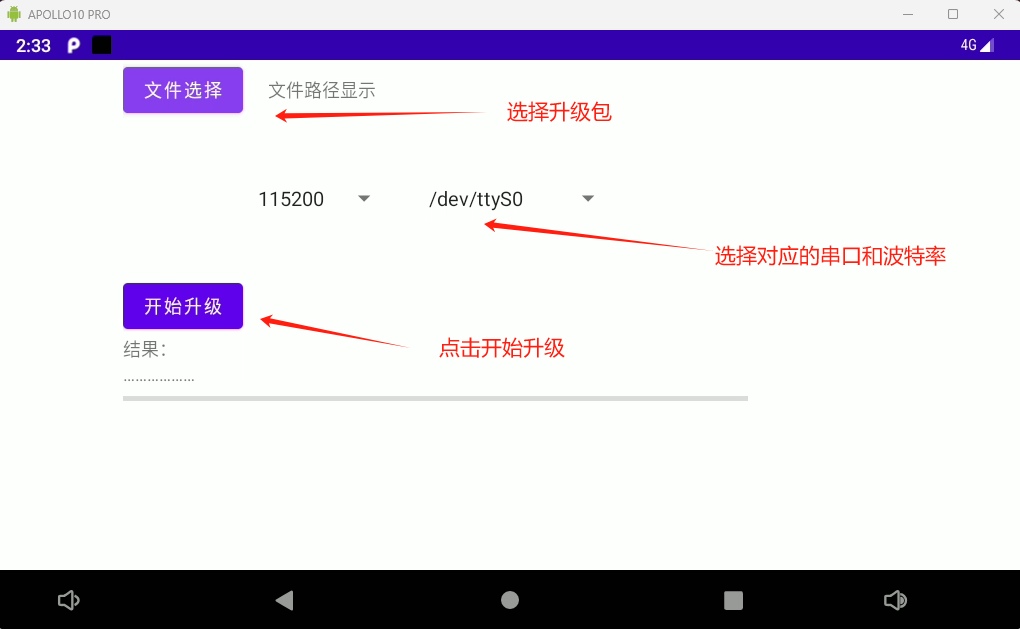,Positioning Module
Positioning Module: GNSS搭铁】烧antenna模拟的相关场景,参考下面步骤\n1. device接地问题\n2. Use时将我们产品When着“电池Use”\n3. 有金属连接或者接触到地线\n\n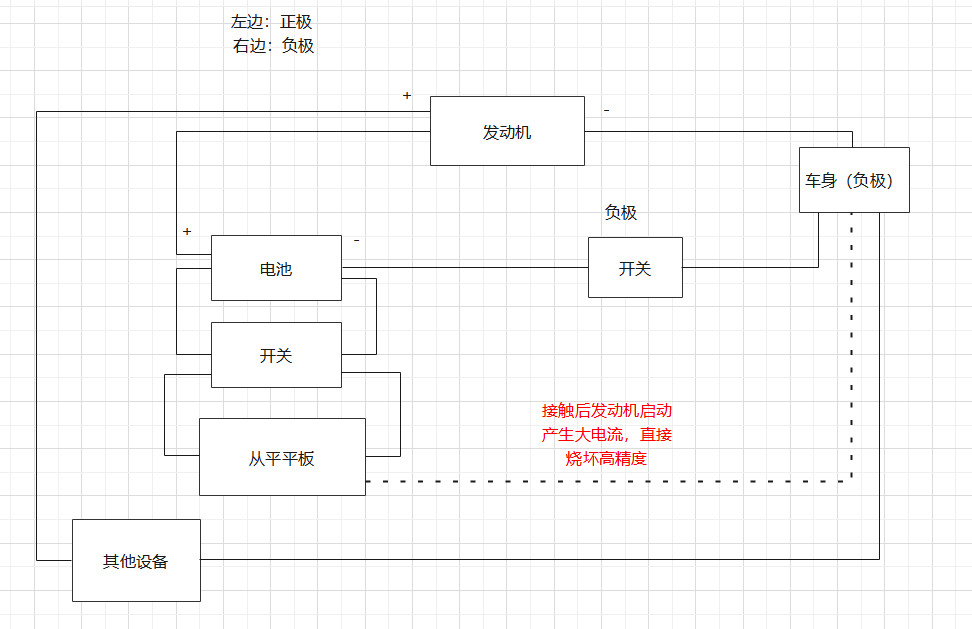,Positioning Module
Positioning Module: positioning板卡指令集】需要各种板卡输出指令command:, 各个板卡指令集参考文档--> [产品文档库 - MDM智能终端管控平台 (cpuniverse.cn)](https://www.cpuniverse.cn/user/document-library-detail/index?id=1636644120745267202&name=GNSS&doc=1638088482406584321),Positioning Module
Positioning Module: GNSS DEMO无法进入差分positioning】调试demo的过程中出现无法进入差分positioningHow to排查?,"参考下面步骤\n1. First确认机型和module类型,If不确定可以提供机器背板对应的SN号给售后查询\n2. 参考对应平板的对应system的相关Demo源码,例如RK_ANDROID_高精度连接--->[产品文档库 - MDM智能终端管控平台 (cpuniverse.cn)](https://www.cpuniverse.cn/user/document-library-detail/index?id=1636563200352768002&name=RK3568&doc=1638090831409762306) \n3. 调试需要准备ntrip账号例如:\n\n static constexpr auto GPS_SERVER_ADDRESS_DEFAULT_VALUE = ""服务器地址"";\n\n static constexpr auto GPS_SERVER_PORT_DEFAULT_VALUE = ""端口号"";\n\n static constexpr auto GPS_USER_NAME_DEFAULT_VALUE = ""用户名"";\n\n static constexpr auto GPS_PASSVWORD_DEFAULT_VALUE = ""密码"";\n\n static constexpr auto GPS_POINT_DEFAULT_VALUE = ""挂载点"";\n\n 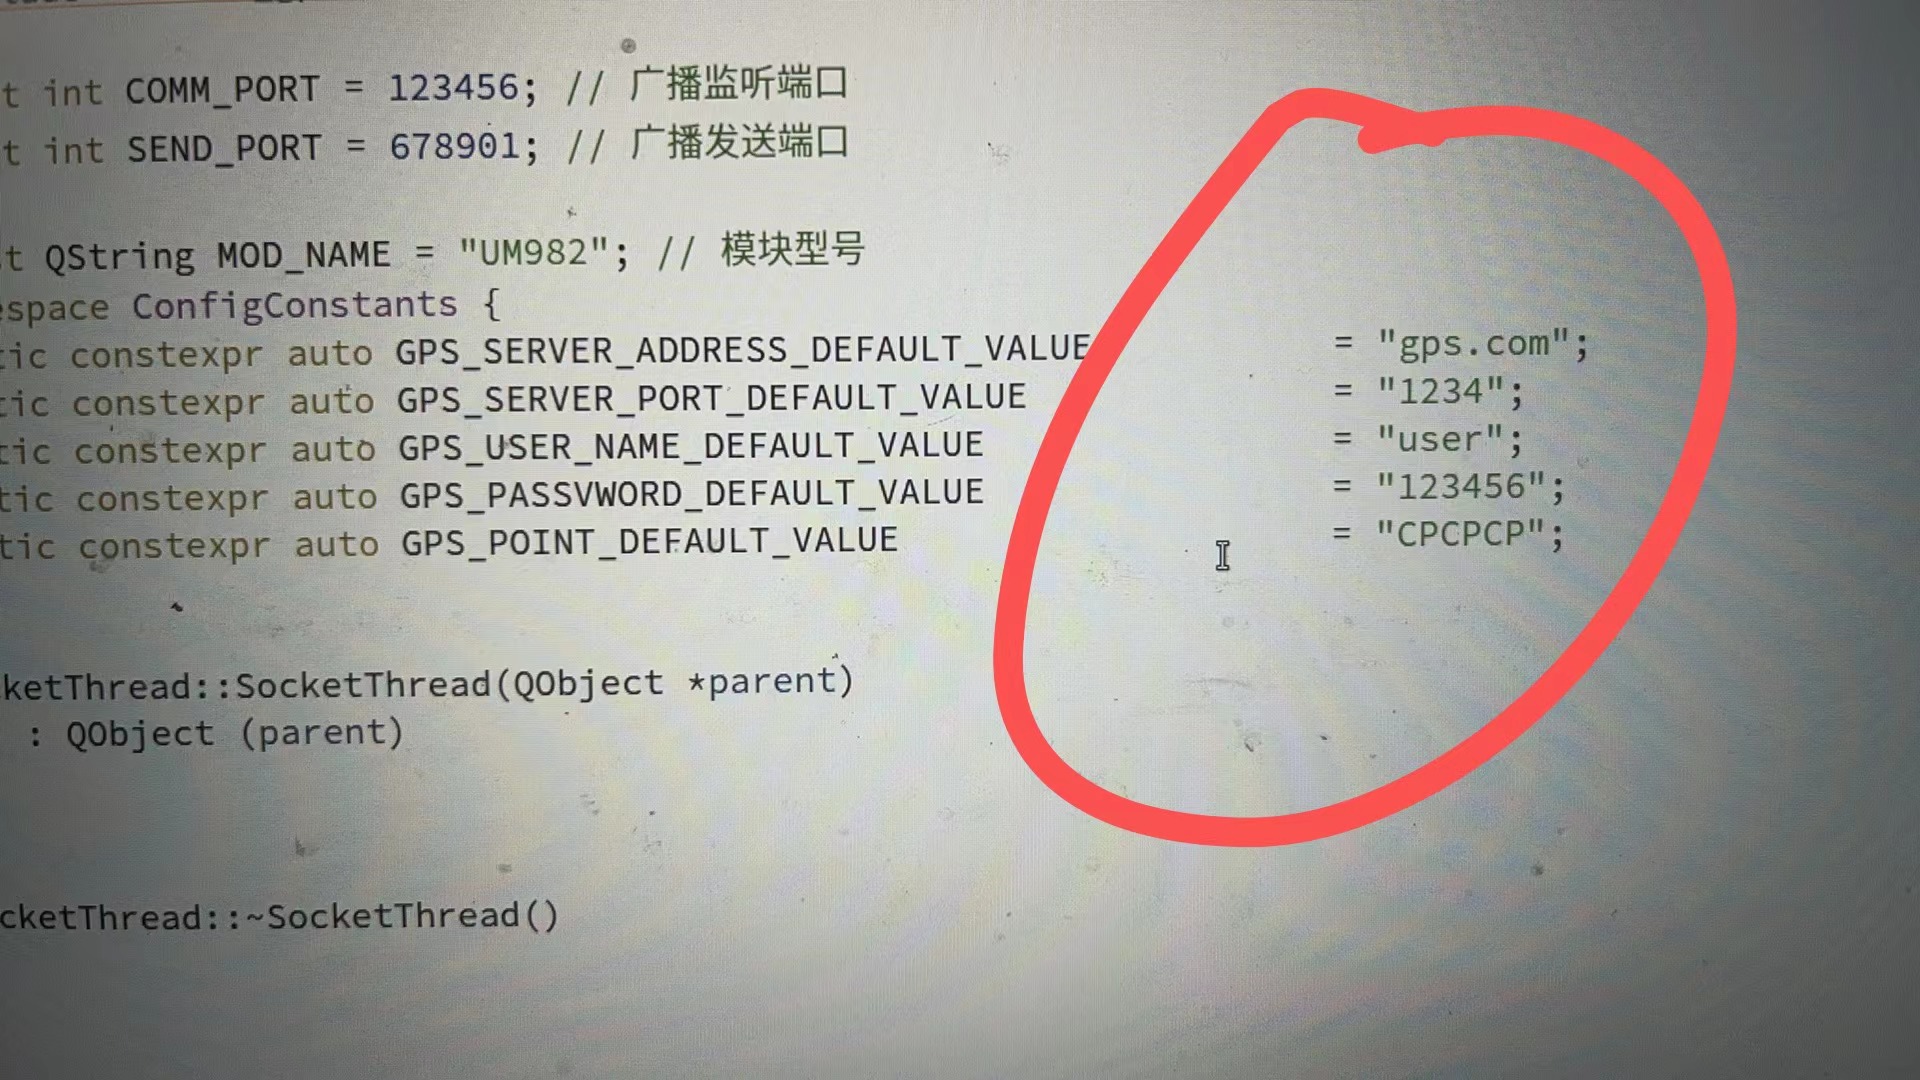\n4. 调试的过程中检测对应的serial port写入和输出数据Does正常\n5. TCP服务连接建立成功\n6. serial port的NAME数据Does全部有通过TCP发送给服务器\n7. 服务器Does有返回RTCM差分感知数据\n8. CheckGGA数据E后面的参数是几? ,进入固定解后成功~~~\n\n $GPGGA,062512.80,2233.17314952,N,11354.23156307,**E,1,**12,1.3,9.9715,M,-3.8538,M,,*77\n\n 解状态: \n\n 0=positioning无效 \n\n 1=单点positioning \n\n 2=码差分\n\n 4=RTK 固定解 \n\n 5=RTK 浮点解",Positioning Module
Positioning Module: SC60低精度获取positioning数据】SC60低精度How to获取positioning数据,Android原生positioning服务LocationManager方法获取:可以从网上搜索相关接口说明,Positioning Module
Positioning Module: UM982】UM982的数据有时是GNGGA有时是GPGGA,UM982会根据现有卫星状态自动切换,Positioning Module
serial port】RS485收发数据异常,1、Check线缆连接Does有误;2、ChecksystemfirmwareversionDoes支持serial port接口对应version\n,Serial Port
serial port】RK3568serial port调试工具,工具Use方法以及Download地址:[Click链接](https://www.cpuniverse.cn/user/document-library-detail-gitbook/index?g=%2Fonline-documents-cn%2FTools%2FTestTools%2FSerialTools%2Fcontent.html)\n,Serial Port
serial port】平板自带的板卡对应的serial port节点信息,MDM上可以检索到:[Click链接](https://www.cpuniverse.cn/user/document-library-detail-gitbook/index?g=%2Fonline-documents-cn%2FDeveloperGuide%2FProgrammingTable%2Fcontent.html)\n,Serial Port
serial port】serial port打开出错,Usecpcomm接口serial port示例尝试:[Click链接](https://www.cpuniverse.cn/user/document-library-detail-gitbook/index?g=%2Fonline-documents-cn%2FDeveloperGuide%2FAppliedCommunication%2FRS232%26RS485%2Fcontent.html)\n,Serial Port
system】安卓端编写的远程控制APP无法控制机器,"该APP没有获取system权限导致,需要在APP源码AndroidManifest.xml加入以下内容,并提供system签名。\n\n```xml\nandroid:sharedUserId=""android.uid.system""\n```\n",System
system】安卓APP实现boot启动,"将源码AndroidManifest.xml进行如下修改\n\n```xml\n\n\n\n\n\n \n \n \n \n \n \n```\n",System
system】hostpotsystem权限问题,"AndroidManifest.xml中增加以下属性\n\n```xml\n\n\n\n\n\n\n\n\n```\n",System
system】T3安卓Useu盘Installapk闪退,system自带file管理器问题,Use第三方file管理器如:ESfilebrowser即可\n,System
system】T3 Buildrootsystem实现软件boot自启动,在/etc/init.d/runqt中将Launcher替换成需要运行的可执行file\n,System
system】安卓禁用下拉菜单和虚拟按钮,"Use以下command修改分辨率\n\n```shell\n# 根据需求调整四个数字,其中数字分别表示 左、上、右、下距边缘的距离\nwm overscan 0,-100,0,-100\n# 恢复默认\nwm overscan 0,0,0,0\n```\n",System
system】T3 buildrootsystemUseWiFidemo,中文的ssid显示异常,修改demo加入中文支持:[Click链接](https://mdmobs.cpuniverse.cn/faq/part2/system/wifiConnect.7z)\n,System
system】我们的平板硬件Does支持过压保护、反极性保护、短路保护,均支持\n,System
system】平板连接键盘、鼠标和硬盘无法Use,需要将机器设置成host模式\n,System
system】cantools工具同时收发是占用率cpu占用率高,cantools工具界面数据流刷新消耗的资源,右下角将显示关闭即可减少占用\n,System
system】T3 buildrootsystem连接WiFi时system时间会不定时倒退几百毫秒,system自带MDM服务,会不定时同步system时间,If影响Use可以在/etc/init.d/rcS中禁用MDM服务\n,System
system】安卓system开启root用户,UseUSB线连接device成功后Use以下adbcommand\n\n```shell\nadb disable-verity\nadb reboot\nadb root\n```\n,System
system】安卓system/sdcard以外的路径无法创建file,/sdcard以外的路径有权限限制,需要在/sdcard内创建\n,System
system】T3 buildrootsystemusb控制台存在阻塞现象,Useadb调试buildroot且打印大量的调试数据的时候会出现这个问题,adb不是Linux专用调试工具,如需进行显示大量数据请Usessh进行调试\n,System
system】DebiansystemQT关机按钮实现,实现例程:[Click链接](https://mdmobs.cpuniverse.cn/faq/part2/system/power_button.7z)\n,System
system】Debiansystem横屏显示方法,依次Click左上角Applications->Settings->Display->Rotation->Left。ThenUse鼠标Click-Apply-保存Configure\n,System
system】CPCOMM占用率在10%左右是正常的吗,是正常的,连接CPCOMM服务之后,考虑到数据较多的情况,采用的时轮询的方式,所以CPCOMM占用是正常的\n,System
system】T3 buildrootHow toUsecommand切换USB主从模式,command如下\n```shell\n# adb 模式\necho 0 > /sys/class/misc/sunxi-gps/rf-ctrl/usbid_con_state adb\n# 主机模式\necho 1 > /sys/class/misc/sunxi-gps/rf-ctrl/usbid_con_state host\n```\n,System
\n\n 二. TANK2device通过serial portcommandCheckDoes有NEMA数据输出:\n\n 1. Usecat /dev/ttyUSB1\n\n adb shell ->进入device\n\n cat /dev/ttyUSB1\n\n 输入完成后会自动吐NEMA相关数据,具体输出格式如下:\n\n $GPGGA,005003.00,1630.570401,,06808.610803,W,1,10,0.7,3770.7,M,40.0,M,,*5A\n\n 2. If输出显示乱码Check波特率Does设置,通过adb设置115200波特率command如下:\n\n adb shell "" stty -F /dev/ttyS0 ispeed 115200 ospeed 115200 cs8""\n3. 输出GGA执行如下:\n\n echo \""GNGGA 1\r\n\"" > /dev/ttyS0 或者Use自带serial port工具发送:LOG GPGGA ONTIME 1\n\ndevice型号/板卡/serial port对应表:\n\n| SPRING1 | ublox | UM982 | UM4B0 | UM482 | UM960 | UM980 | MXT906B | P20E |\n| ---------- | ----- | ----- | ----- | ----- | ----- | ------- | ------- | -------- |\n| ttyS0 | | COM2 | COM3 | COM3 | | | | |\n| ttyS2 | | COM1 | COM1 | COM1 | | | | |\n| | | | | | | | | |\n| SPRING2 | ublox | UM982 | UM4B0 | UM482 | UM960 | UM980 | MXT906B | P20E |\n| ttyS0 | | COM2 | COM3 | COM3 | COM1 | COM1 | COM1 | COM1 |\n| ttyS2 | COM1 | COM1 | COM1 | COM1 | COM2 | COM2 | COM2 | COM2 |\n| | | | | | | | | |\n| | | | | | | | | |\n| APOLLO PRO | ublox | UM982 | UM4B0 | UM482 | UM960 | UM980 | MXT906B | 南方电台 |\n| ttyWK0 | | COM1 | COM1 | COM1 | | | | COM1 |\n| ttyWK2 | | COM3 | COM3 | COM3 | | | | COM3 |\n| ttyHSL2 | | | | | | | | COM2 |\n| | | | | | | | | |\n| APO2 7/12 | ublox | UM982 | UM4B0 | UM482 | UM980 | MXT906B | P20E | P20F |\n| ttyS0 | | COM2 | | | COM2 | COM2 | COM2 | COM2 |\n| ttyS7 | | COM1 | | | COM1 | COM1 | COM1 | COM1 |\n| | | | | | | | | |\n| SP2 10PRO | ublox | UM982 | UM4B0 | UM482 | UM960 | UM980 | MXT906B | P20E |\n| ttyS0 | | COM2 | | | | COM2 | COM2 | COM2 |\n| ttyS4 | | COM1 | | | | COM1 | COM1 | COM1 |\n| | | | | | | | | |\n| TANK1 | ublox | UM982 | UM4B0 | UM482 | UM960 | UM980 | MXT906B | P20E |\n| ttyHSL2 | COM1 | | | COM3 | | | | |\n| | | | | | | | | |\n| TANK2 | ublox | UM982 | UM4B0 | UM482 | UM960 | UM980 | MXT906B | P20E |\n| ttyS0 | | COM2 | | | | COM2 | COM2 | COM2 |\n| ttyS7 | | COM1 | | | | COM1 | COM1 | COM1 |\n\n------",Positioning Module
Positioning Module: TANK2 EG25】如和把原始数据转换成经纬度生成.kmlfile,"一. Use如图公式生成经纬度,根据经纬度导入后生成.kmlfile\n\n\n\nA=C的整数\n(C-A*100)/60+A\n\n二. EG25支持卫星 GPS, BeiDou, Galileo and GLONASS",Positioning Module
Positioning Module: UM982】板卡升级version提示失败,1.需要boot直接进入UM982升级的APK,否则会有serial port被占用的情况导致升级失败。\n\n[UM98升级apkDownload连接](https://mdmobs.cpuniverse.cn/faq/part4/MeterLevel/UM982%E5%8D%87%E7%BA%A7.apk)\n\n升级firmwareContact从平售后\n\nInstallapk升级方法如图:\n\n,Positioning Module
Positioning Module: GNSS搭铁】烧antenna模拟的相关场景,参考下面步骤\n1. device接地问题\n2. Use时将我们产品When着“电池Use”\n3. 有金属连接或者接触到地线\n\n,Positioning Module
Positioning Module: positioning板卡指令集】需要各种板卡输出指令command:, 各个板卡指令集参考文档--> [产品文档库 - MDM智能终端管控平台 (cpuniverse.cn)](https://www.cpuniverse.cn/user/document-library-detail/index?id=1636644120745267202&name=GNSS&doc=1638088482406584321),Positioning Module
Positioning Module: GNSS DEMO无法进入差分positioning】调试demo的过程中出现无法进入差分positioningHow to排查?,"参考下面步骤\n1. First确认机型和module类型,If不确定可以提供机器背板对应的SN号给售后查询\n2. 参考对应平板的对应system的相关Demo源码,例如RK_ANDROID_高精度连接--->[产品文档库 - MDM智能终端管控平台 (cpuniverse.cn)](https://www.cpuniverse.cn/user/document-library-detail/index?id=1636563200352768002&name=RK3568&doc=1638090831409762306) \n3. 调试需要准备ntrip账号例如:\n\n static constexpr auto GPS_SERVER_ADDRESS_DEFAULT_VALUE = ""服务器地址"";\n\n static constexpr auto GPS_SERVER_PORT_DEFAULT_VALUE = ""端口号"";\n\n static constexpr auto GPS_USER_NAME_DEFAULT_VALUE = ""用户名"";\n\n static constexpr auto GPS_PASSVWORD_DEFAULT_VALUE = ""密码"";\n\n static constexpr auto GPS_POINT_DEFAULT_VALUE = ""挂载点"";\n\n \n4. 调试的过程中检测对应的serial port写入和输出数据Does正常\n5. TCP服务连接建立成功\n6. serial port的NAME数据Does全部有通过TCP发送给服务器\n7. 服务器Does有返回RTCM差分感知数据\n8. CheckGGA数据E后面的参数是几? ,进入固定解后成功~~~\n\n $GPGGA,062512.80,2233.17314952,N,11354.23156307,**E,1,**12,1.3,9.9715,M,-3.8538,M,,*77\n\n 解状态: \n\n 0=positioning无效 \n\n 1=单点positioning \n\n 2=码差分\n\n 4=RTK 固定解 \n\n 5=RTK 浮点解",Positioning Module
Positioning Module: SC60低精度获取positioning数据】SC60低精度How to获取positioning数据,Android原生positioning服务LocationManager方法获取:可以从网上搜索相关接口说明,Positioning Module
Positioning Module: UM982】UM982的数据有时是GNGGA有时是GPGGA,UM982会根据现有卫星状态自动切换,Positioning Module
serial port】RS485收发数据异常,1、Check线缆连接Does有误;2、ChecksystemfirmwareversionDoes支持serial port接口对应version\n,Serial Port
serial port】RK3568serial port调试工具,工具Use方法以及Download地址:[Click链接](https://www.cpuniverse.cn/user/document-library-detail-gitbook/index?g=%2Fonline-documents-cn%2FTools%2FTestTools%2FSerialTools%2Fcontent.html)\n,Serial Port
serial port】平板自带的板卡对应的serial port节点信息,MDM上可以检索到:[Click链接](https://www.cpuniverse.cn/user/document-library-detail-gitbook/index?g=%2Fonline-documents-cn%2FDeveloperGuide%2FProgrammingTable%2Fcontent.html)\n,Serial Port
serial port】serial port打开出错,Usecpcomm接口serial port示例尝试:[Click链接](https://www.cpuniverse.cn/user/document-library-detail-gitbook/index?g=%2Fonline-documents-cn%2FDeveloperGuide%2FAppliedCommunication%2FRS232%26RS485%2Fcontent.html)\n,Serial Port
system】安卓端编写的远程控制APP无法控制机器,"该APP没有获取system权限导致,需要在APP源码AndroidManifest.xml加入以下内容,并提供system签名。\n\n```xml\nandroid:sharedUserId=""android.uid.system""\n```\n",System
system】安卓APP实现boot启动,"将源码AndroidManifest.xml进行如下修改\n\n```xml\n\n\n\n\n\n \n \n \n \n \n \n```\n",System
system】hostpotsystem权限问题,"AndroidManifest.xml中增加以下属性\n\n```xml\n\n\n\n\n\n\n\n\n```\n",System
system】T3安卓Useu盘Installapk闪退,system自带file管理器问题,Use第三方file管理器如:ESfilebrowser即可\n,System
system】T3 Buildrootsystem实现软件boot自启动,在/etc/init.d/runqt中将Launcher替换成需要运行的可执行file\n,System
system】安卓禁用下拉菜单和虚拟按钮,"Use以下command修改分辨率\n\n```shell\n# 根据需求调整四个数字,其中数字分别表示 左、上、右、下距边缘的距离\nwm overscan 0,-100,0,-100\n# 恢复默认\nwm overscan 0,0,0,0\n```\n",System
system】T3 buildrootsystemUseWiFidemo,中文的ssid显示异常,修改demo加入中文支持:[Click链接](https://mdmobs.cpuniverse.cn/faq/part2/system/wifiConnect.7z)\n,System
system】我们的平板硬件Does支持过压保护、反极性保护、短路保护,均支持\n,System
system】平板连接键盘、鼠标和硬盘无法Use,需要将机器设置成host模式\n,System
system】cantools工具同时收发是占用率cpu占用率高,cantools工具界面数据流刷新消耗的资源,右下角将显示关闭即可减少占用\n,System
system】T3 buildrootsystem连接WiFi时system时间会不定时倒退几百毫秒,system自带MDM服务,会不定时同步system时间,If影响Use可以在/etc/init.d/rcS中禁用MDM服务\n,System
system】安卓system开启root用户,UseUSB线连接device成功后Use以下adbcommand\n\n```shell\nadb disable-verity\nadb reboot\nadb root\n```\n,System
system】安卓system/sdcard以外的路径无法创建file,/sdcard以外的路径有权限限制,需要在/sdcard内创建\n,System
system】T3 buildrootsystemusb控制台存在阻塞现象,Useadb调试buildroot且打印大量的调试数据的时候会出现这个问题,adb不是Linux专用调试工具,如需进行显示大量数据请Usessh进行调试\n,System
system】DebiansystemQT关机按钮实现,实现例程:[Click链接](https://mdmobs.cpuniverse.cn/faq/part2/system/power_button.7z)\n,System
system】Debiansystem横屏显示方法,依次Click左上角Applications->Settings->Display->Rotation->Left。ThenUse鼠标Click-Apply-保存Configure\n,System
system】CPCOMM占用率在10%左右是正常的吗,是正常的,连接CPCOMM服务之后,考虑到数据较多的情况,采用的时轮询的方式,所以CPCOMM占用是正常的\n,System
system】T3 buildrootHow toUsecommand切换USB主从模式,command如下\n```shell\n# adb 模式\necho 0 > /sys/class/misc/sunxi-gps/rf-ctrl/usbid_con_state adb\n# 主机模式\necho 1 > /sys/class/misc/sunxi-gps/rf-ctrl/usbid_con_state host\n```\n,System